
THE LARGEST BMW 2-SERIES FORUM ON THE PLANET

| DIY Guide M235i M-Performance Diffuser install with stock exhaust (requires cutting) |
Post Reply |
|
|
Thread Tools | Search this Thread |
| 04-26-2016, 06:32 AM | #1 |
|
Lieutenant
 
377
Rep 596
Posts |
DIY Guide M235i M-Performance Diffuser install with stock exhaust (requires cutting)
Ok, so i know this will probably have been posted a couple of times already. Just wanted to share my experience when doing this the other day and hopefully it'll be useful to someone at some point. I tried to make it as close to the BMW instructions as possible, although some minor parts may differ. All i know is that it works and looks good.
Fitting M-Performance Diffuser to M235i with stock exhaust system and reusing stock exhaust tips. Parts required: BMW M-Performance rear diffuser BMW Intermediate Pipe extenders Tools required: Socket set with extenders (8mm - 14mm adapters) Needle nose pliers Rubber Mallet Wood cutoffs Reciprocating Saw Flathead Screwdriver Masking tape (optional) or pen Measuring tape Highly recommended: Car lift - would not want to do this on jack stands myself, although it would be possible Second person to assist 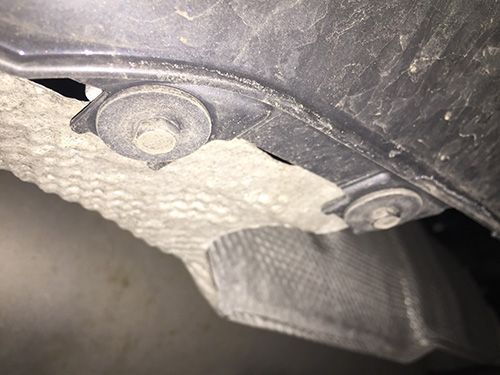 Removing stock diffuser: Remove the six 8mm bolts holding the bottom of the stock diffuser in place. There are also two pop rivets to remove, one at the very end of each side of the diffuser – use needle nose pliers in conjunction with flat head screwdriver for this. They should remove in their entirety with little difficulty. Once this is done, starting at the edge, pull the diffuser straight out towards you in order to disengage the wedge clips holding it into the metal rail on the bumper panel. This is realatively painless and you can reach up in between the heat shield and the diffuser to get a location on the clips and how they are seated. Once one is off, the rest follow. 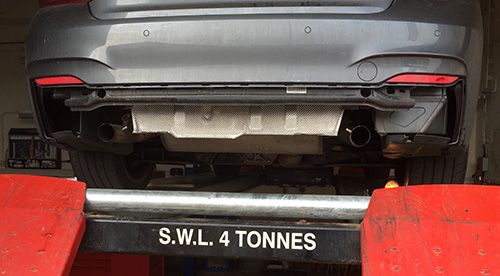 The stock tips can be removed using a wooden mallet in conjunction with a piece of wood to act as a buffer. Hitting against the pointed edge of the tip, use liberal force to disengage the spring clips. This requires a surprising amount of force to do, but is in no danger of doing any damage. For the 235i, mark up 120mm in from the exhaust pipe end for cutting. 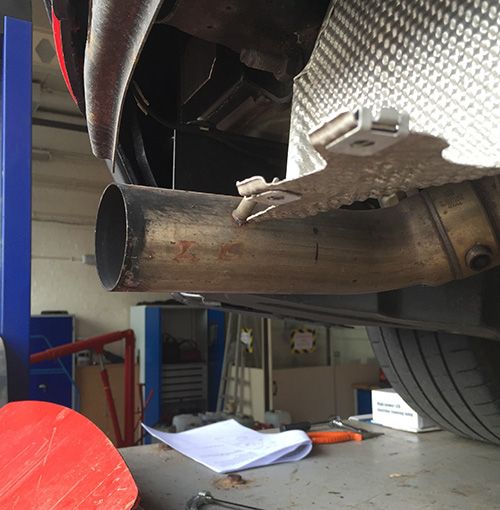 Use of a reciprocating saw is strongly advised for cutting through the pipe. This takes about 2-3 minutes of solid cutting to get through. Once the 120mm of pipe (including the tip location peg) is removed, debur the edge with a file and apply some anti corrosion treatment to the cut edge. I used Hammerite Krust. 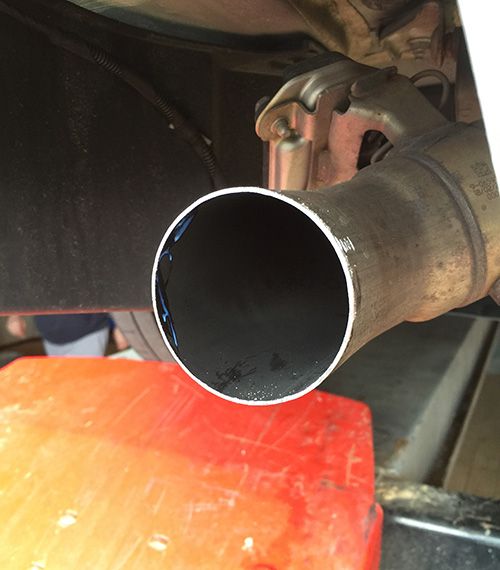 For the braket install to reinforce the heat shield, remove the three 8 mm speed nuts from underneath the heatshield. It helps to drop the rear muffler to improve access – two 14 mm (I think) bolts hold it on. One at the top of each hanger; either side of the muffler. 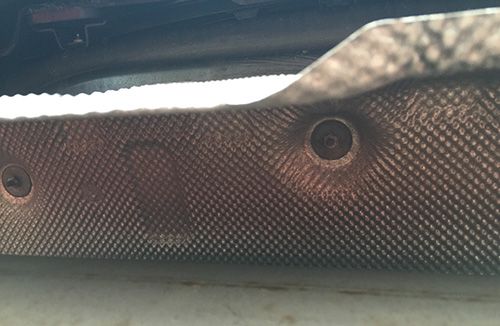 With the heat shield off (it is a two piece item, the rear part stays on the car) the brackets can be lined up, and the lower portions clipped under the C clips. The tops of the brackets are sandwiched between the heat shield and bodywork when refitted. 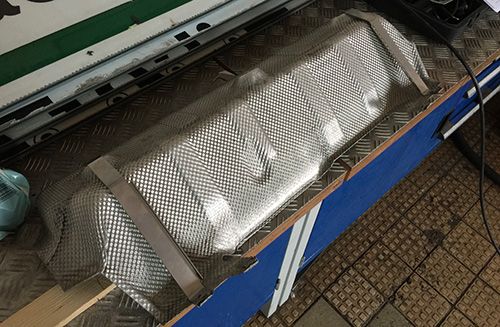 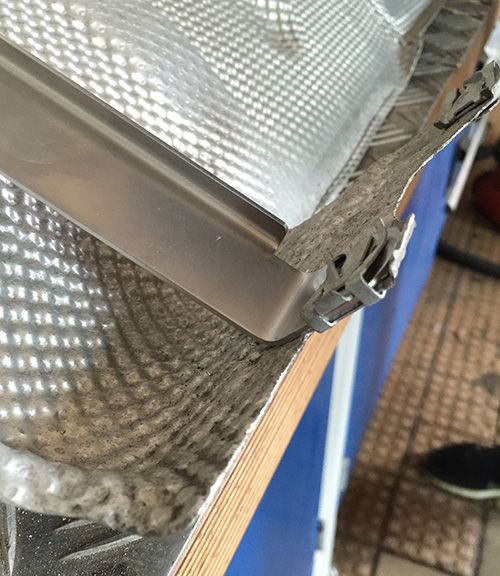 With heat shield and brackets on, remount the muffler and prepare to fit the intermediate pipe adapters. 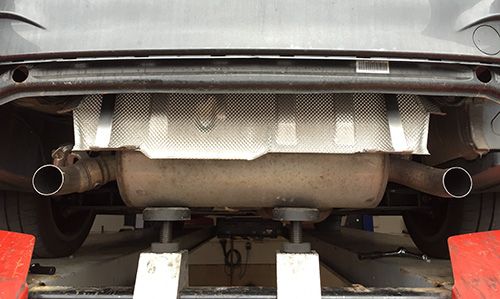 Test fit the adapter pipes. The narrow end with the crush spaces should easily clear the cut and no gap should be present. 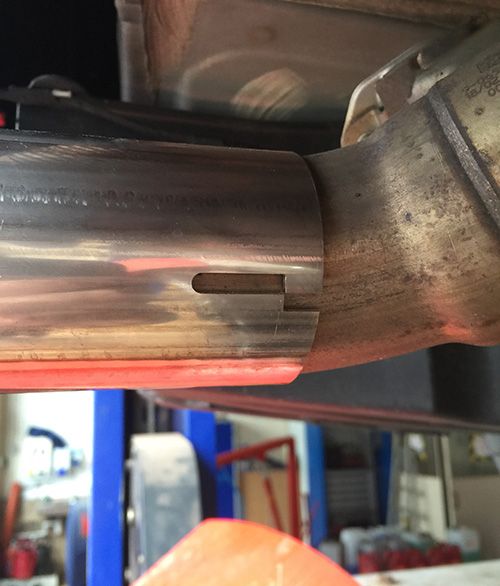 Fit the stock tips to the intermediate pipes (if you’re reusing them) BEFORE putting the adapter on the car. The force required will potentially cause damage to the exhaust, as the pipe diameter on the adapters is much wider than the stock pipe is. Using a vice and the rubber mallet makes the task easier. Again, use a piece of wood as a buffer between the mallet and the tip, ensuring small taps for even seating. The spring clips do suffer some deformation doing this, but if the prongs are visible at the exhaust end, they can be bent over with pliers if you feel its necessary. 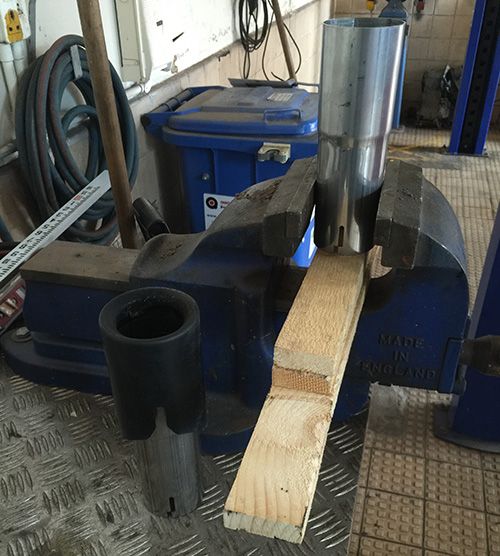 Once this is done, place the clamps on the pipes and slide them into postion. They run all the way back to the bend in the exhaust. Run up the 14mm bolt to 70nm (or just as tight as it’ll go if you don’t have torque wrench). 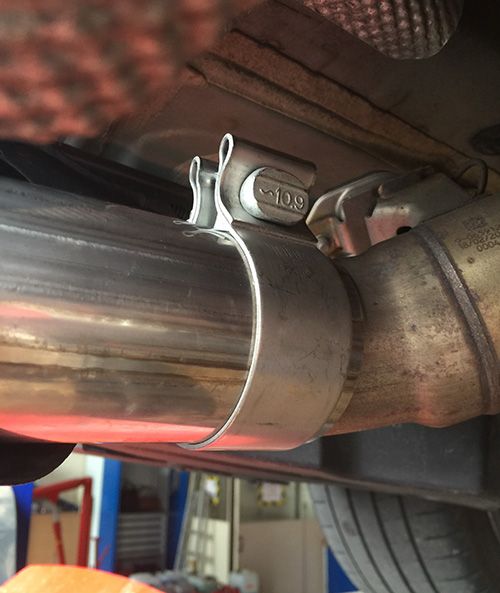 As you can see below, the prong on the spring clip is visible. Bend it with pliers if it bothers you, although its only really visible up close and head on. 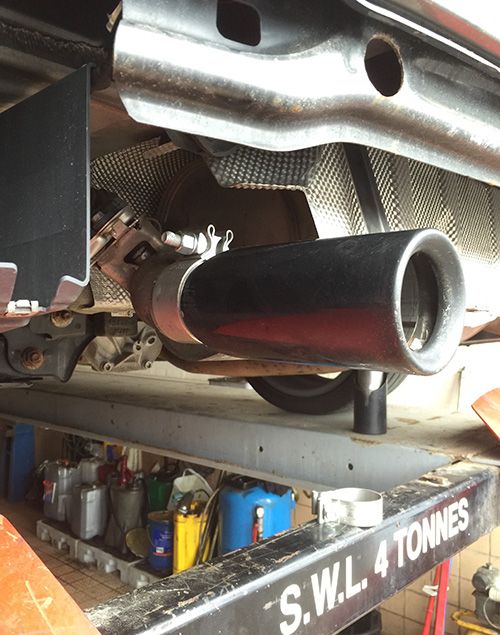 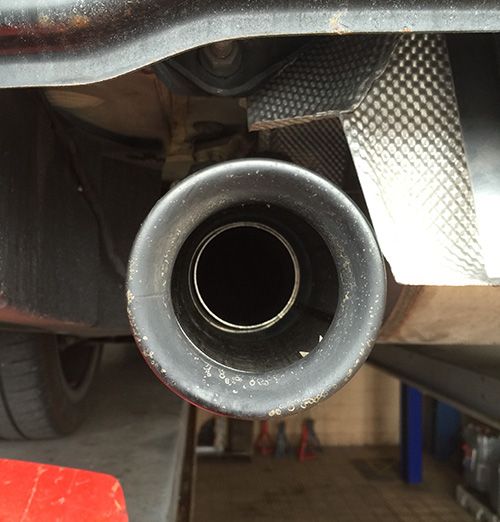 Last step is putting the m-perf diffuser on. Basically, just the reverse of the removal. Really does help having a second person to aid in lining things up. Line up the clips - pay attention to the underneath too and ensure that the heat shield is above the bottom of the diffuser and the holes line up for the speed nuts. The best technique for clip engagement is starting at one side and pushing at the top edge of the diffuser. Use the base of your palm on the raised lip where the line is along the top. Push forward and up at the same time with a lot of force – lean into it- they will go in. This took about 10 minutes to do. The force is met by the rear crash structure so don’t worry about the heat shield. The brackets are just for added security for the bottom of the diffuser. If needed use a fine, but blunt, piece of metal to persuade the clips to go in – only needed this technique for the very last clip. Put the speed nuts and pop rivets back in place to conclude. Pop rivets may need slight rubber mallet persuasion – a couple of gentle taps works. 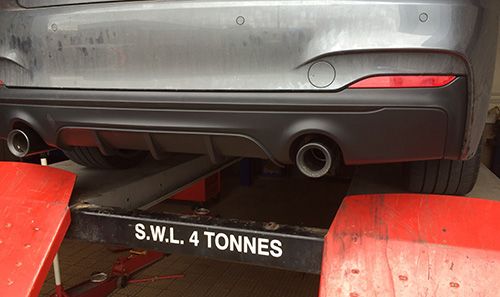 Then you're done! Hopefully, if things go straight forward, it should take no more than a couple of hours to do. If any part is too vague, I'm more than happy to provide clarification. Hope this helps. Last edited by allthatisntnow; 04-26-2016 at 06:51 AM.. Reason: Additional details |
| 05-10-2016, 03:58 AM | #2 |
|
Major

468
Rep 1,151
Posts
Drives: F90 M5 Comp (Evolve Tune)
Join Date: Apr 2010
Location: Buckinghamshire, England
|
i just did tips on my car, im surprised you didnt swap your weathered black tips for M performance ones, I like the standard rear box so just added tips with adaptors, and when i change my rear diffuser in few weeks it will still fit perfect. Only part you have to cut is the small metal stopper sown in pic. But thanks for the advice on removing diffuser.
|
|
Appreciate
0
|
| 05-10-2016, 05:48 AM | #3 |
|
Lieutenant
377
Rep 596
Posts |
Yeah, you can just take the locating pin off and it would work ok, but i followed the BMW dealer protocol for installation which cuts the pipe for whatever reason. They must have some logic behind doing it that way, even if its just a put off for people doing DIY
 I guess you have more freedom to go shorter on the adjustment if need be without having an odd looking double walled pipe. But as a means of being functional, it would be 100% fine. I guess you have more freedom to go shorter on the adjustment if need be without having an odd looking double walled pipe. But as a means of being functional, it would be 100% fine. With regards to the tips, i personally prefer the black to the m-perf chrome. Mine aren't in great shape admittedly, but you'll know yourself how much road salt we see in winter. I did rub them down with a bit of oil, but some pitting is inevitable. Hope your install goes smoothly. Getting the new one on really is the hardest part, but pushing it as mentioned really takes the pain out of doing it. |
|
Appreciate
0
|
| 05-10-2016, 01:17 PM | #4 |
|
Major
468
Rep 1,151
Posts
Drives: F90 M5 Comp (Evolve Tune)
Join Date: Apr 2010
Location: Buckinghamshire, England
|
yeah i didnt like the black pipes they get lost when following an m235 against the dark diffuser, the chrome makes it stand out look a bit meatier and love the little etched logo on the top. I didnt even realise bmw suggest cutting the pipe short, the guy at parts place never mentioned that to me, what is the reason for having to cut the pipe.?
|
|
Appreciate
0
|
| 05-10-2016, 04:14 PM | #5 | |
|
Lieutenant
377
Rep 596
Posts |
Quote:
No specific reason given. |
|
|
Appreciate
0
|
| 05-11-2016, 04:03 AM | #7 | |
|
Major
468
Rep 1,151
Posts
Drives: F90 M5 Comp (Evolve Tune)
Join Date: Apr 2010
Location: Buckinghamshire, England
|
Quote:
|
|
|
Appreciate
0
|
| 05-11-2016, 04:06 AM | #8 | |
|
Lieutenant
377
Rep 596
Posts |
Quote:
|
|
|
Appreciate
0
|
| 05-11-2016, 04:16 AM | #10 | |
|
Lieutenant
377
Rep 596
Posts |
Quote:
|
|
|
Appreciate
0
|
| 05-11-2016, 09:27 AM | #11 |
|
Major
468
Rep 1,151
Posts
Drives: F90 M5 Comp (Evolve Tune)
Join Date: Apr 2010
Location: Buckinghamshire, England
|
Ive heard from GTR forum and few others this place is great at it normally just 150 for roof in gloss black. www.pwpro.co.uk
Its a two hour trek for me but id do it as know their work is good. So prob near to you. Heres pic of another members white one with roof wrapped. |
|
Appreciate
0
|
| 05-12-2016, 11:18 AM | #12 |
|
Lieutenant
377
Rep 596
Posts |
It does look pretty good. But it most likely won't be economical for me to go to Nottingham for a roof wrap as I'm a bit further away than you even. Im north east as in Newcastle/boarders north east.
|
|
Appreciate
0
|
| 05-18-2016, 12:01 PM | #13 | |
|
Private First Class
 
184
Rep 135
Posts |
Quote:
|
|
|
Appreciate
0
|
| 05-18-2016, 12:50 PM | #14 | |
|
Lieutenant
377
Rep 596
Posts |
Quote:
|
|
|
Appreciate
0
|
| 02-24-2017, 06:07 PM | #20 | |
|
Lieutenant
377
Rep 596
Posts |
Quote:
|
|
|
Appreciate
0
|
| 02-25-2017, 09:38 AM | #21 | ||
|
First Lieutenant

145
Rep 343
Posts |
Quote:
Good to hear that  |
||
|
Appreciate
0
|
Post Reply |
| Bookmarks |
|
|

 I'm getting ready to do this to mine.


