Did the installation of the BimmerTech PP82DSP amp this morning. I thought it might be useful to post how it went, along with some comments.
Tools required:
10mm socket with 3" extension
8mm socket
Small flathead screwdriver to pop trunk liner retaining clips
T40 Torx or small ViceGrip to remove trunk floor loop bolt
Tiny allen key (5/64" ??) and needlenose pliers to flip mount orientation
Optional:Longer USB cable with 90 degree end and / or ferrite choke
High adhesion tape
Recommended Software:
The tune files are as-supplied by the vendor. They suggest that the next step for harmon kardon users may be to replace the metal dome tweeters, which they find to be a bit harsh. In my car, I have disabled the Power Save Mode option in the tune that I use, as explained below.
The amp arrived via USPS 2-day Priority Mail, which took 3 days to get to my office after it was sent (Ben Franklin frowns). The outer box looked as through it had been stepped on. Inside, a smaller box was sliding around merrily, having been held in place with too little packing.
The inner box was a white package with a seal and "F22" on the end (yay!). A slot had been cut in the box to allow part of the mounting frame to poke through. My guess is that the white box is the one that Bimmertech receives all their units in, and is sized for the F30 unit which doesn't need a specialty mount.

So, what's in the box? The contents are below. The amp, mounted to the installation frame, a harness to connect to the car, and a 5' USB cable. The mounting frame is really nice, well made with an even crinkle finish.


Now, that's it. The amp with frame and harness attached and a loose USB cable. Nothing else. NADA. No installation instructions. Not even a piece of paper directing me to some website for more info. Bupkis.
Hey, no problem. Installation must be intuitively obvious. Well, we'll see.
First, I turned DIP switches 2 and 4 on. Not because it's intuitively obvious, but because I'd seen one of the Bimmertech folks mention it online in another thread. Really? I'd suggest a note to tell people how to set the DIP switches.

Next, I replaced the 5' cable with a 6' one that had a 90 degree connector added to the end (the vendor has noted they plan to add a 90 degree connector in the future). The cable I used also has a ferrite choke on the end, because who needs stray signals floating around in there (and because that was the only 6' cable I had lying around)? A bit of tape
* secured the adapter to the cable, and then another bit of tape secured them both to the USB connection in the amp. Last thing you want is for the connector to fall out at some time in the future, requiring you to take your trunk apart again to plug it back in.
* I used Zip System flashing tape, AKA The Tape From Hell. Don't let it touch anything you don't want it to try to grab onto and hold as though its life depended on it.

My car is a 2015 M235xi with the harmon kardon audio package. ASD was disabled using a TechnicPNP ASD removal harness. That installation was described here (
http://www.2addicts.com/forums/showthread.php?t=1202389), and I'm cribbing mercilessly from the trunk disassembly instructions I posted for that.
NOTE: YOU NEED TO DISABLE ASD, EITHER THROUGH THE HARNESS I USED OR BY CODING IT OUT. It will be very obtrusive if you do not. If you love that ASD sound, this is not the amp you're looking for. You can check with the vendor to see if they offer the ASD removal cable when you purchase the amp, as there was some discussion of that becoming an option.
Before you do anything else, turn down all the volume controls in the car. The radio, navigation voice, gong, parking monitors, phone, all of them. Last thing you want is something to start SHOUTING at you the first time you turn it on.
The amplifier and ASD module are in the left side of the trunk, behind the liner.
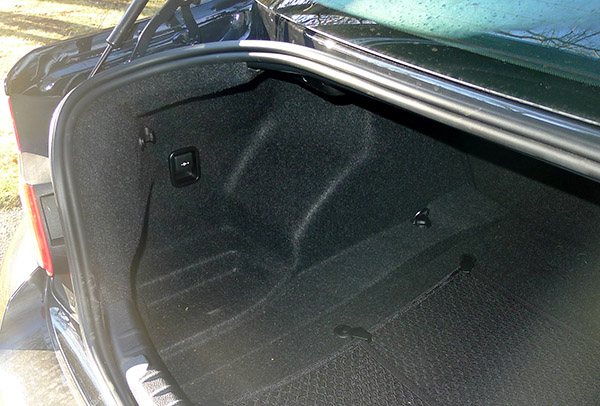
There are connectors in the trunk holding the inner liner to the body, one on a hook, one a straight pin connector, and one under the floor tiedown.

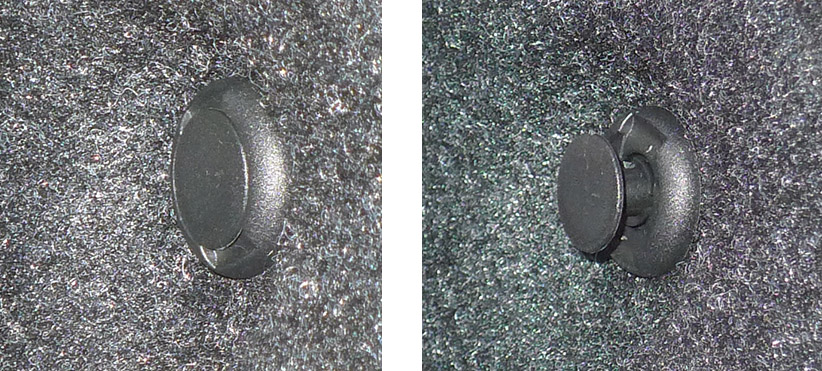
Biggest nuisance is removing the floor loop. The plastic cover is easily popped off, revealing a large Torx bolt underneath. Naturally, this is in an odd size that doesn't match any of my Torx keys. Fortunately, it is easily grabbed with a small ViceGrip, and once it's loosened a 1/4 turn, can be easily removed by hand.

The pin and hook connectors are easily removed by pulling the center section out and then removing the entire connector from the liner. Take care to not break the tabs and the connector can be reused at assembly.
One more pin connector remains, hidden behind the folding seat. Drop the driver's side rear seat to expose the connector, and remove it in the same manner as the others.

The back edge of the trunk at the latch now needs to be removed. Remove the four pin connectors from the cover plate, pull the trunk edge seal free, and remove the back plate.

Once the trunk edge plate has been removed and the trunk lip seal has been removed just past the edge of the trunk liner, the trunk liner can be moved away from the body of the car. Move it about 6" away from the body, reach behind, and unplug the back connector on the trunk power socket. Then move the liner out of the way.

The amplifier and ASD module are under the plastic liner support. Lift the liner support out of the way, allowing access to the electronics.
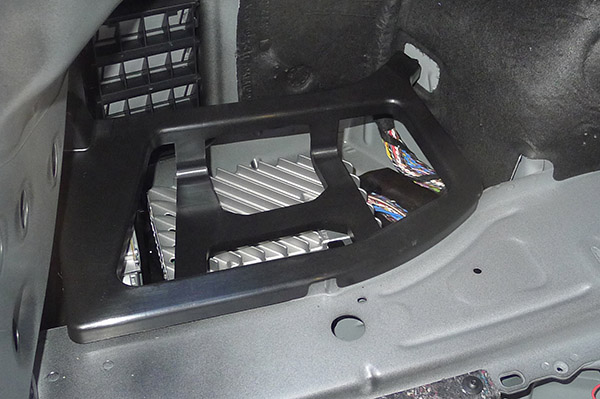
The amp is the larger of the two under the tray, with the small vertical unit being the ASD module. My wiring looks slightly different from stock here due to the ASD removal harness, but it doesn't change the install at all.
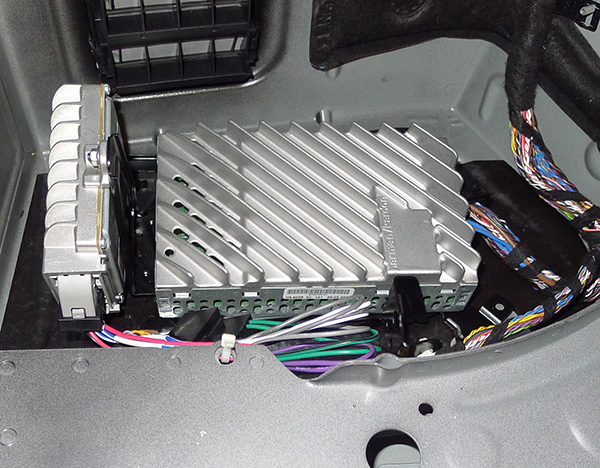
OK, let's see what we've got here. No obvious way to remove the old unit. Does the new one just sit on top? No, that doesn't look right. Well, let's start poking.
Aha. There it is. A 10mm nut looks to be holding the tray down. Are there any others? I can't see any, but I can't see how everything goes in. OK, jam the camera in and start taking pictures to see what else is hiding in there. OK. it looks like there's the one nut and then two slide posts holding everything down.

Let's pull that nut and see what happens. Pop the 10mm socket on the handle, slide it over the nut and .............. I've only got about an inch to work the socket back and forth. OK, grab an extender.
And that when I find out I don't have an extender for my 1/8" socket. Really? For the love of ....
Ah, screw it. Spend 5 minutes working the ratchet head back and forth one click at a time. Finally, get the nut off.
OK, lets see what happens. Give it a tug. Hmmmmm. Nothing. Well, it's a German car, maybe the only thing it understands is force. Grab the far side of the amp and give it a TUG. And it slips out of the slide post and mashes my little finger between a couple of hard pointy things. Mother...
OK, in any event, it's loose. The whole shooting match pops out of the little well and can be moved out where you can see what's happening.

Turning it around reveals an 8mm hex head (sure, why use the same size?) that's holding the OEM amp in place. Pop it off and the amp slides right off the mounting tray.

Press the retainer tab on the harness lock, slide the clip down, and the harness pops right out of the back of the amp.

OK, let's pop that new amp in with the screw tab in the right place and ..... Uh, wait a minute. If I put this on the way the amp is on the tray and then put it into the little well in the car, all of the things I might want to get access to (DIP switches, micro SD card slot, USB connector) are going to be on the far side of the amp, hard up about a half inch off the wall of the fender. That's not good. This is not the way I'd have put it on the mount. But, that can be fixed.

OK, into the house to turn it around, because it's 30 degrees out here (that's -1 to you poor folk stuck with SI units). The tray is held on with 4 small allen head screws. Grab a small allen key, sit down on the couch, start turning, and after about 15 turns ..... a little nut falls out of the amp, bounces off the hardwood floor, and flips under the couch. You miserable son of a ....... Has no one heard of self-tapping screws or retained nuts? Apparently not.
Anyway, crawl around on floor feeling around under couch, and finally come up with it after first getting a whole bunch of dust bunnies ("Well, the vacuum cleaner head doesn't fit under there." - The Wife). Go over to the kitchen table and take the rest of the screws out in the box.
OK, putting it back together is a real pain. The little free bolts need to be held in with a needle nose plier while you try to arrange a screw - tray - washer - amp sandwich with the other hand. Harder than it sounds, and I kept doing screw - washer - tray instead of screw - tray - washer. Eventually got it done, but it took around a half hour. Via a response in this thread below, the manufacturer should be mounting this way in the future, but you should check before you go out the car in the first place.


EDIT: It looks like the manufacturer does read the forum, and is planning on shipping the mounts in the above configuration. Check that yours in the in the right position out of prudence, but kudos to BimmerTech.

Now, let's plug the two white cable connectors on the harness into the two white sockets on the amp. Not because anyone told us to, but because that seems to be the thing to do here. Again, a single sheet of paper telling this stuff to the person installing the amp would be nice. Looks like the amp is being attacked by an octopus here.

OK, now take the amp back to the car. Drop the bottom of the mounting tray into the slots on the mounting frame from the car, slide the tab up aginst the screw hole, and run the hex head in. The amp is now on the mounting frame for the car.

Finally, plug the harness from the car into the socket on the cable that came with the amp (it only goes one way), slide the clip up over the latch pin, and all the wiring should be done. Before everything gets put back in, let's turn on the car and see if there's sound. Hey! It makes noise! OK, let's get to reassembling stuff.

Drop the tray down into the well. Put it all the way towards the front of the car, then slide it towards the rear, lifting the hole in the tray where the nut will go over the pin that the nut screws onto. Make sure the slide pins are in their little grooves, and slide it towards the back of the car until it stops. Great! Lets just put that little nut back on.

Finger tighten the nut over the screw post (Hey, I didn't drop it!) until it hits the plastic insert that keeps it tight. Pull out the 10mm socket and tighten it up.
Ah, dammit! With all the extra wires, I can't get enough swing on the handle to click the ratchet. This isn't going to work without an extender. And as I found out earlier, I don't have one.
Fortunately, my wife's car is behind mine in the driveway. A quick run to Home Depot provides the extender, and the nut runs right down on the post.
The thing to do now is to test the software connection to my laptop. "Wait a second", you say. "It didn't say nothing about software on the box. Or in the box. Or on the amp. How did you know about this software?" Oh, I saw that in another post on some forum online. And you've seen it in this post. What more can you ask for?
Anyway, pull out the laptop on which I've installed the software, and plug the USB cable in and ... watch it fail to find a driver. Uh, that's not good. Maybe this doesn't need a driver? Fire up the software and .... no connection found.
Oh for the love of .... I've got to play Windows driver debug? Well, OK, uh .... Ah, hell. It's starting to snow. And I'm in the driveway with the back end of my car disassembled. Driver games will have to wait, I need to get this thing closed up. At least the laptop sees the amp, so I know I've got a functional cable connection.
Before closing up, make sure you leave the USB cable end in the battery compartment so you can get at it. Then, use a small zip tie or two to secure the harnesses to the frame of the car so that they don't shake back and forth to create a rattle behind the lining of your trunk.

That seems to be it.
Reassemble the trunk liner in the reverse order that you took it apart.
- Place the support tray over the electronics.
- Plug the power connector onto the back of the trunk power socket.
- Slide the trunk liner back onto place.
- Replace the 3 pin connectors and one screw connector that hold the liner in place.
- Replace the trunk back panel cover at the back edge of the trunk over the trunk liner.
- Replace the 4 pin connectors holding the trunk back panel.
- Reseat the trunk lip edge seal onto the metal rim of the body and over the edges of the trunk liner and trunk back panel. This is an enormous pain in the neck to get into place properly. Work slowly and from the outer edges towards the center. Be prepared to swear mildly from time to time.
Got everything buttoned up, and rolled into the house. Started digging around on the computer. Apparently, the software installation program put a USB driver program in the Program Files directory of the software itself, but didn't bother to run it. Nah, why would you expect the install program to install everything it needs? So, run it by double clicking on the file name, reboot the computer, and go back out to the car. Plug it in again, watch the USB drivers install, start the software, and ... hey, it's up! Success!
EDIT: The paragraph immediately above was with Version 2 of the software. A later version is linked at the top of the post above, and THAT one did install the drivers.
And it's snowing and it's cold. I'll deal with tuning later. Poking around online shows a bunch of people saying they have the "custom" file for the F22, but all of the files posted seem to start with "F30". Well, we'll see what a bit more digging (and perhaps emailing) turns up.
EDIT: About a month after my initial install, BimmerTech released tuning files for F22 cars with either the HiFi or harmon kardon systems. Those files are now up at the top of this post. As stated both above and below, the only change I made to this is disabling the Power Save mode as noted in the edit immediately below.
EDIT: One thing that popped up in the first week of use is that the "Power Saver" function on the amp disables both the phone and navigation speakers if the radio is "off" for more than 60 seconds. As such, I would
highly recommend that the "Power Save" be disabled. To do this, use the following steps:
- Connect the amp to a computer with the tuning software.
- Start the software package.
- On the main screen, press the "DCM" button (upper right). I assume this means "Device Configuration Menu".
- On the pop-up page, make sure the "Activate Power Save Mode" box (upper center) is unchecked.
- On the main screen, press the "Save & Store" button
This will insure that your telephone remains active in case of an incoming call or an emergency situation.
Total time was around two hours, including a half hour or so to turn the mount around on the amp and perhaps 25 minutes to go to Home Depot to get a 3" extension for my small socket. This doesn't include poking around trying to figure out why the computer wouldn't connect.
Not a bad install. Not everything is obvious, however. Desperately needs more instructions if you haven't been lucky enough to trip over the right threads online. Then again, anyone reading this already has.
FWIW,
George